Showing posts with label Washi Tape. Show all posts

4.05.2016

Happy Mail and a Thank You

Yesterday I received some happy mail from upline, Dawn Griffith, and I have YOU to thank for it. I was one of her top 10 in sales last month thanks to all of you who took advantage of the final month of Sale-A-Bration!  THANK YOU for continuing to support my business!!!!  Here is the card that Dawn sent me.

Created by Dawn Griffith


This card reminds me of my Washi Tape Christmas card, flipped on its side and done in happy bright colors.  I love the little washi tape punch she used for the birthday sentiment.  I need to order that, but keep forgetting.  Thank you, Dawn, and thank Stampin' Up! customers for giving me the best Sale-A-Bration ever!

1.01.2014

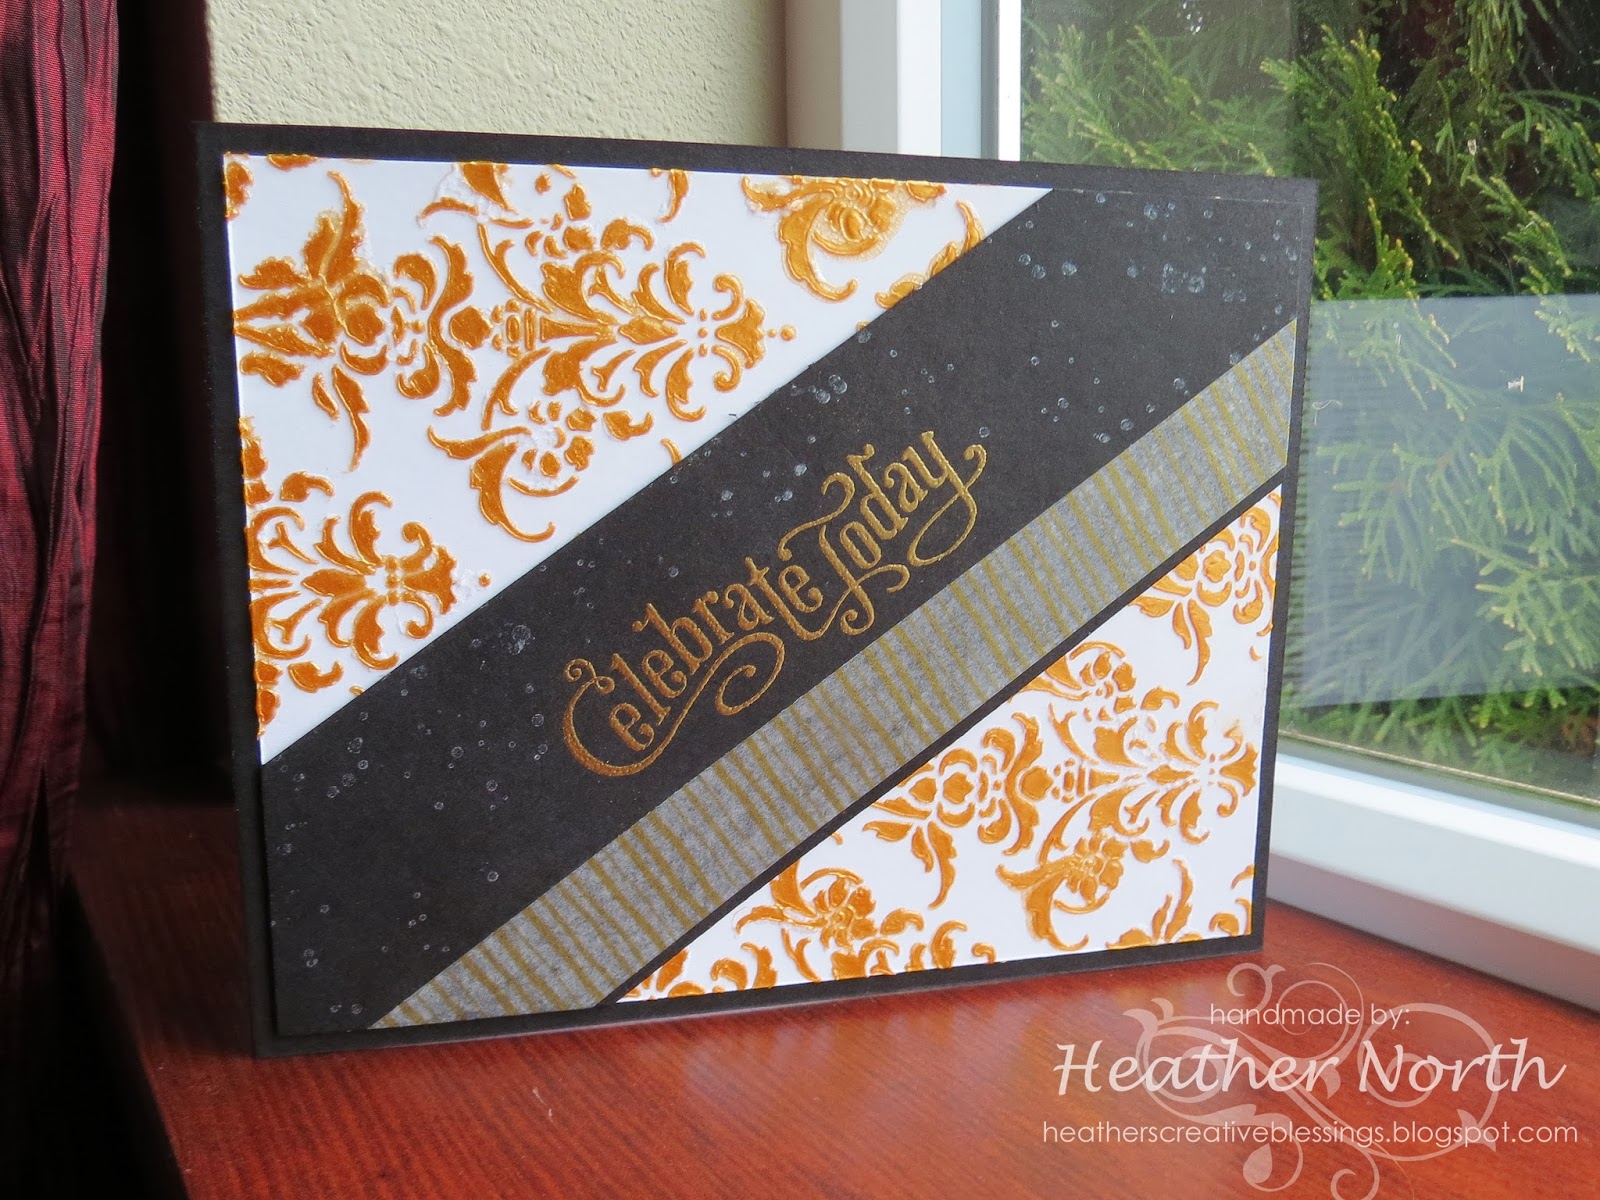
Celebrate Today

HaPpY nEw YeAr to YOU!  Did you have a fun time ringing in the new year last night?  Everyone but the animals enjoyed it at our house.  Poor little Bella and Sasha do not like fireworks and they went off every hour, at least, for about 6 hours.  

Welcome 2014!

Towards the end of last year I was having an online discussion about embossing paste with some of my StampNation sistahs.  If you haven't heard of embossing paste, you will.  It's one of the hottest trends in paper crafting right now.   Around that time my friend Kristie received the gifting ball and she passed the ball on to me with a jar of Wendy Vecchi Metallic Gold embossing paste inside.  I squealed when I opened the package.    :)

Embossing paste reminds me a little bit of whipped frosting.  The metallic gold I used here is a bit softer than that.  The white paste I bought from Add A Little Dazzle is a bit fluffier.   To make my card I laid a damask metal stencil over my white cardstock, then I plopped the embossing paste on top and spread it with an offset spatula.  (the kind you find in the cake decorating aisle)


As you can see I am a long way from perfecting this technique.  Some of the paste seeped beneath my stencil.  I'm not sure why.  Perhaps I should watch the video Monica sent me as a prize and learn how to use this properly.  :)  I like the look though.  I didn't expect it to be perfect.


The center panel was embossed with gold embossing powder.  Then I stamped Iluminate ink with one of my Gorgeous Grunge stamps.  (I LOVE that stamp set!)   The finishing touch was to add my new Watercolor Wonder Washi Tape to the center panel as well as on the inside of the card.

On Sunday I will share with you my thoughts on the new year and some new goals.  For this first post of the new year I will let you in on one of them, enter more challenges!  They really do get my mojo flowing.  I'm linking this card up with the Friday Mashup Challenge.   Don't you just love the bling on those shoes?!  The challenge was to make a project with some glitter/shimmer/bling.   It feels like all my cards lately have a little bit of that on them.  


Happy New Year again to you and yours!  May this year be a year of creativity and joy!

Creative Blessings,
Heather North

Stampin' UP & Other Supplies Used
Stamps: Gorgeous Grunge, Perfectly Penned
Ink: Versamark, Illuminate Glimmer Pad
Paper: Basic Black, Whisper White
Misc: Damask Metal Stencil (DreamWeavers), Metallic Gold Embossing Paste (Wendi Vechi), Gold Watercolor Wonder Washi Tape (DU)

11.13.2013

Easy Washi Tape Christmas Card

Do you know how fun it is to log onto one of your favorite challenge sites and discover you were chosen as one of their top 3?!  Thank you TSOT for the honor.  I love your sketches and it is a thrill to be in the top 3 this week.

Top Three Badge
TSOT

Christmas is only 6 weeks away.  That means it is time to start working on our Christmas cards.  This one would be sooooooooo easy to mass produce quickly if you want to make several of the same design.


The strips of color along the bottom of the card are all washi tape.  It's so easy to tear and stick.  The ornament was stamped in Cherry Cobbler, then punch out using the Christmas Ornament punch.  I popped it up on dimensions and used some linen thread to "hang" it.


My card was created for the design team at StampNation from a fab-u-lous sketch I will be using over and over again. 


If you don't have washi tape and want to make this card consider using strips of paper.  It's a great way to use up scraps.  How about a star or tag instead of an ornament?  I hope this card inspires you to make at least one Christmas card this year.  It doesn't have to be difficult to be beautiful.

Creative Blessings,
Heather North


Christmas Collectables Clear-Mount Bundle
Christmas Collectables Bundle

Season Of Style Designer Washi Tape
Seasons of Style Washi Tape


9.09.2013

HB KK

Happy Birthday to my friend and fellow SN design team member, Kristie Goulet.  Kristie is one of the sweetest people you could ever hope to meet.  She's always on top of the trends and on top of sending out cards too.  That is why when I found out today was her birthday I really wanted to make a card and get it sent out in today's mail.


If you've never seen Kristie's Kreations before, be sure to check out her blog.  She has a clean, trendy style with a bit of fun thrown in.  I decided to CASE one of her cards and make it my own with some Washi Tape.  Here is the card that inspired me.


Kristie Goulet

The inside of my card to her is decorated as well.  I stamped the sentiment, then put a strip of Washi Tape under it before punching it out with the Decorative Label punch.  Then I layered that punch with an Island Indigo Artisan Label Punch.  


After I mailed out the card and picked up the kids from school I made a couple more Washi Tape cards and even filmed a video.  :)  Hopefully I will have that video edited and up soon for you.  It really is a quick and fun card to make.  


Happy Birthday Kristie!  I hope all your birthday wishes come true!!!  Thanks for your friendship and inspiration.

Creative Blessings,
Heather North

Stamps: Bring on the Cake, Love Deepens(Verve)
Paper: Island Indigo, Whisper White
Ink: Island Indigo
Misc.: Gingham Garden Washi Tape, Basic Rhinestones, Artisan Label Punch, Decorative Label Punch

Artisan Label Punch
Artisan Label Punch

Gingham Garden Designer Washi Tape
Gingham Garden Washi Tape

8.30.2013

Washi Tape Goes Back To School

It's back to school time for many of us and I found a new use for my washi tape... decorating book covers and binders.  My son needed a book cover for his extra large books, so we went old school and pulled out the paper bags.

Covering these books with my son brought back memories.  He will probably add camo duct tape and draw jets or something else on the front, but I got to them first and introduced him to Washi Tape.  The WA is for his Washington History class, the other one just has a few strips in the corner.  He thought it would be cool to run the strips of Washi Tape on an angle across the entire cover of his book.  It would, but I don't have enough Washi Tape for that.  ;)


Epic Day This And That Designer Washi Tape
Epic Day Washi Tape
I thought I had the new Witches Brew Washi Tape, but apparently I didn't order it.  He would have liked that one too.  He will probably need a new cover before Halloween rolls around, so perhaps I should order him his own set.  :)


Witches' Brew Designer Washi Tape
Add caption


Have you used any of your craft supplies as back to school embellishments?  I think it would be great to stamp the front of these paper bag covers.  What do you think?  It could also dress up a Binder.   The Gingham Garden Washi Tape would be great for girls who love flowers or like pink.  We shall see what my son ends up doing.  I've learned that teenage boys have a mind of their own and I like to see what he comes up with when he gets creative.


Today I loaded up the 148 pictures I have taken this week.  Holy smokes, it's been a busy week. I won't bore you with all of them, but I will likely do a Sunday Share to show you a few highlights.    The picture above is in the hallway at the local Middle School.  Come back tomorrow to see my Crazy Cat blocks for the SSMQG challenge.

Creative Blessings,
Heather North

8.27.2013

Just Because Hexagons

Yesterday's hexagons would work great for any guy to send or receive.  Today I put a more feminine touch on the card simply by changing the colors and the font on the sentiment.  Isn't it cool how versatile some stamp sets can be? 


Originally I had planned on wrapping Baker's Twine around the left hand side of the card, but I didn't have a color that went well with the colors I had stamped, so I cut the white panel a bit shorter and embossed the edge of the Smoky Slate cardstock.  It still felt like I was missing something so I tried adding a piece of Washi Tape. 


It works and it added a bit of playfulness to the card.  I do think that I need a pink and white Baker's Twine though.  :)  Actually it would be fun to have Baker's Twine in every color.


We're off for our annual "last day of summer vacation field trip".  It's one of the kid's favorite traditions.  Hope you have a fun day and have time to get a little creative.

Creative Blessings,
Heather North


Six-Sided Sampler
Six Sided Sampler


Gingham Garden Designer Washi Tape
Gingham Garden Tape


6.27.2013

Sunshine On A Cloudy Day

We have dark grey cloudy skies with showers again today.  I'm probably the only person in the state that isn't complaining about it though because it has knocked down my allergies, and it it's helping me heal.  :)   Besides, I looked at the forecast and it's supposed to be sunny and 80's starting tomorrow.  Could get up in the 90's by the 4th of July.   That's hot for our area.  :)


To bring a little sunshine to those of you who want it I have another card created for this week's Summer Challenge at StampNation.   I believe the challenge was to create a card that makes you think of a sunny day. 


With the card open you can see how the embossed sun is layered on the inside and the flip flops are attatched on the top.  The flip flops are from a local stamping store that is going out of business.  :(  So sad that Cindy is retiring.  (Cindy's Simple Stuff)  She has a great little store and so many creative ideas.   She said she will be doing small events at her home though, so hopefully I will get to stamp with her again.  Cindy was the first person I met when my husband took the job here in Washington.  Her shop was just around the corner from the hotel his company put us in.  I took it as a SIGN that we had heard from God correctly that this little town was where we were supposed to move to.   :)

Her Tuesday Dollar Demos are what finally taught me how to make cards and gave me courage to keep trying and learning.  From there I started watching YouTube and learning more, and taking classes at her shop and learning more and signing up for online clubs and learning more and eventually led me to being a demonstrator with SU so I could buy everything at a discount.  I told my husband that I put her out of business by shopping from home on my Stampin' UP! site and forgetting to go in to her store.  Just kidding.  Her business has been thriving, she is just ready to get her life back after all these years invested in her business.


The sun rays were made with Washi Tape from the new SU Gingham Garden Washi Tape.  When that was done my sun looked pretty empty.  I had made my sun really big, not knowing the sandals were really small.  Soooooooooo, I pulled out the A Round Array stamp set and some punches and added a sentiment.  Then I took some basic rhinestones and scattered them all over the card.   What you can't see is the shimmer mist I sprayed on the embossed sun piece.  It adds a nice sparkle.


When I placed my new catalog order I forgot to include the new Circle Framelits.  Drat.  I cut my big circles using my old Creative Memories CCS, and I didn't have the right size to create the size of sun I wanted.  They were either too small or too big.  It still works, but when I get the new circles from SU I might try this again and get it to a better scale, and it will stand up better on it's own.

Creative Blessings,
Heather North


Gingham Garden Designer Washi Tape
Gingham Garden Washi Tape

A Round Array
A Round Array

Gingham Garden Designer Series Paper
Gingham Garden


Circles Collection Framelits Dies
Circles Collection Framelits


6.20.2013

Masculine Card Video ~ Part 1

Short and sweet today.  Here is part of one of the video I made before Father's Day.  Sorry my attack of vertigo made this posting too late for Father's Day, but there are still some great techniques you can use on any card.  Besides all it takes to change the card is to change the sentiment.  ;)

***Note - If you are reading this post in an email or reader, you may need to click on the post title "Masculine Card...." above to go to my blog and watch the video.


Click HERE to see the original post for the first card:


Click HERE to see the original post for the second card:


Creative Blessings,
Heather North

P.S. Watching the video I can see that I was already not feeling well.  :(  Hopefully I will be able to edit the second video for you tomorrow.  I couldn't concentrate enough yesterday to do it. I went to the doctor today and there is still lots of fluid in my inner ear so I will need a second round of steroids.  No infection yet though, and my vertigo is getting better every day.   I was even able to sit in my stamp room for about 15 minutes this morning.  :)  It's the little things.  Thank you for the prayers, concern and kind thoughts.  You are a blessing to me. 


6.06.2013

The Open Sea ~ Masculine Card

My card today was made for a design team challenge over at StampNation.  We had several pictures to use as our muse and I kept being drawn to a framed picture of a map on the wall.  Sooooooooo, I made my own framed "map" using some Epic Day Designer Series Paper.

From that starting point, and some help from an old Mojo Monday sketch, I pulled this card together.  I let the paper decide the colors for me.   Here's a tip for you:  If you look in your catalog at the description of the DSP you will see all of the colors listed for each paper pack. 


I stamped the ship from The Open Sea onto one of the pieces of patterned paper.  Then I sponged the water portion with Pool Party and a touch of Island Indigo.  Next I used my White Gel Pen to make the sails stand out a bit more.  After I punched out the image with my large circle punch I added dash lines and a bit more Pool Party sponging around the edges. 


The last step for me was to add the sentiment.   This card could easily be a birthday card or retirement card or used for any occasion.  It isn't frilly and pink, so it works for any guy in my life.  However, this card will be going to someone extra special next week.  ;)

Creative Blessings,
Heather North


This And That Epic Day Designer Series Paper
This & That Epic Day DSP

The Open Sea - Clear-Mount Stamp
The Open Sea

Epic Day This And That Designer Washi Tape
Epic Day Washi Tape
 

5.23.2013

Sunshine to Others

Are you ready for a sneak peek at some of the new items from the new SU catalog being released next week?  I had fun playing with one of the new InColors, Pistachio Pudding, and pairing it with the new Gingham Garden Washi Tape.


If you have never played with Washi Tape before you should give it a try.  It's like tissue paper with post-it note sticky on the back.  It sticks to paper, but doesn't tear your paper when you peel it back up.  You can see through the tape like you can with tissue paper.  I put a strip of white cardstock behind my washi tape so the bright colors would POP, but it was also pretty straight on the Pistachio Pudding cardstock with the green showing through.


To create the sentiment I took another piece of Whisper White cardstock and used a sponge to color the paper with Daffodil Delight ink.   Then I stamped my sentiment using Night of Navy ink.  I recently took the plastic wrap off that ink pad and I've been using it for my sentiments with the Gingham Garden paper.  I really like how this ink looks and it's fun to break away from black and browns for a change.  After I cut the sentiment out with my framelit, I sponged a little more around the edges to make it stand out a bit more.


This finishing touch has to be my fluttering butterfly.  I punched the larger butterfly out using Melon Mambo cardstock and the smaller butterfly using a scrap of Gingham Garden DSP.  Then I stuck half the butterfly to my sentiment layer and left the other half floating off the page.  To add a bit of sparkle I used the medium sized Basic Rhinestones.

Creative Blessings,
Heather North

P.S.  My heart has been heavy this week with the things going on at our local high school and the tragedy of Moore, OK, along with the news of a friend's husband passing.  I found I couldn't make a card and couldn't post without mentioning the tragedies.  I'm thankful for this card I made last week for the SN challenge because it is a reminder to bring sunshine into the lives of others.  My prayers are with the loved ones left behind after the tornados in OK and the suicide of one of our RHS students.  The loss of a child is something I cannot comprehend.  {hugs} to you.  <3 Heather

Card Recipe:
Stamps: Feel Goods
Ink: Daffodil Delight, Pistachio Pudding, Night of Navy
Paper: Pistachio Pudding (New 2013 InColor), Whisper White, Melon Mambo, Gingham Garden DSP
Misc: Fancy Fan Embossing Folder, Gingham Garden Washi Tape, Basic Rhinestones, Labels Framelits, Elegant Butterfly Punch, Bitty Butterfly Punch

Feel Goods Clear-Mount Stamp Set
Feel Goods
Fancy Fan Textured Impressions Embossing Folder
Fancy Fan Embossing Folder