Showing posts with label Perfectly Penned. Show all posts

5.29.2014

Celebrate this Sketch

Today I managed to carve out some time to play in my stamp room.  My Stampin' UP! order with all the new InColors was calling my name.  I had so much fun playing with my new "Work of Art" stamp set and colors. 


Of course I had to grab Blackberry Bliss first.  I really love the way this color looks when stamped off!  It's pretty in all its shades.   My inspiration for this card comes from CAS(E) this Sketch.  

CTS#78

In fact the sketch is what prompted me to get up and go stamp.  I've been suffering with bad allergies all week, so I haven't felt very creative, but when I saw this sketch I was immediately inspired.

This was almost a one layer card, but the paint stripe wasn't long enough for me, and I wanted to add some embellishments.  It's still clean and simple with just a simple mat and some small star sequins from Pretty Pink Posh.


Thank you, CAS(E) this Sketch for getting me out of bed and down to my stamp room.  I actually feel a little better now.  

Supplies (Stampin' UP! unless otherwise noted)
Color: BlackBerry Bliss (New), Whisper White
Stamps: Work of Art (New), Perfectly Penned (Retiring)
Misc: Star Sequins (Pretty Pink Posh), Itty Bitty Accents Punch Pack (New)

1.01.2014

Celebrate Today

HaPpY nEw YeAr to YOU!  Did you have a fun time ringing in the new year last night?  Everyone but the animals enjoyed it at our house.  Poor little Bella and Sasha do not like fireworks and they went off every hour, at least, for about 6 hours.  

Welcome 2014!

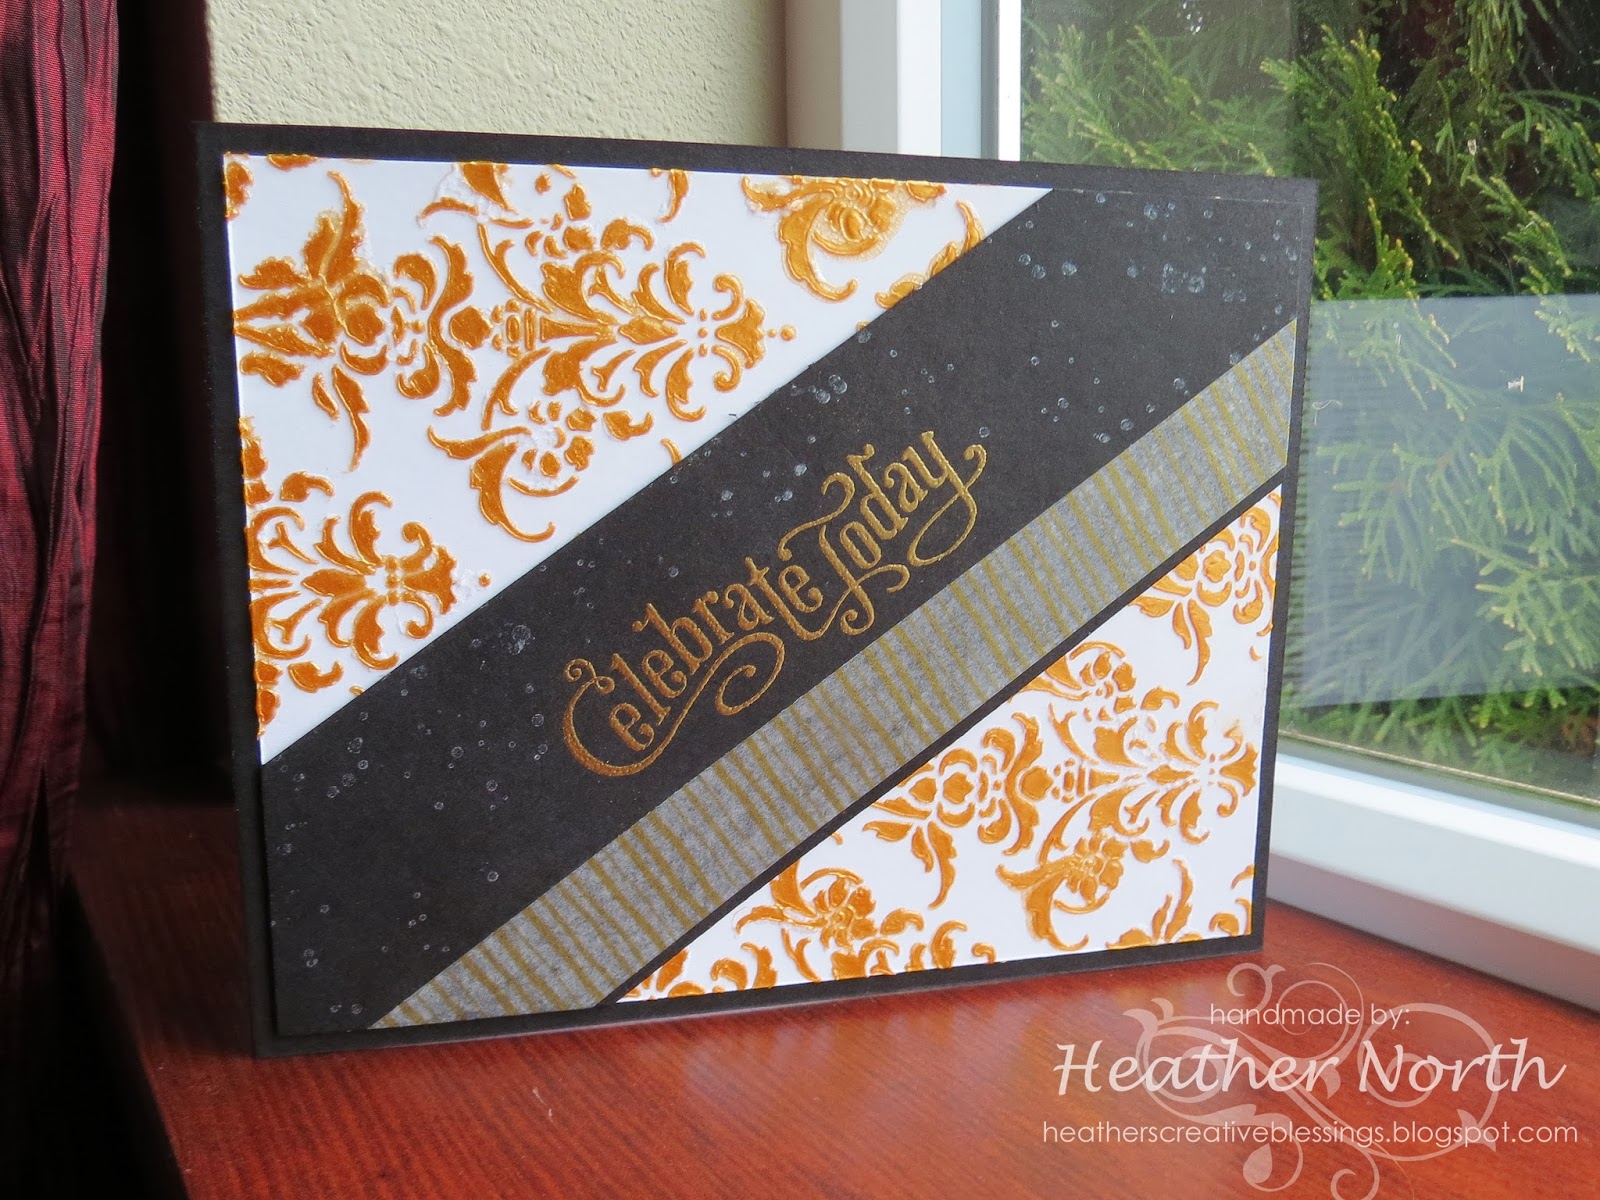
Towards the end of last year I was having an online discussion about embossing paste with some of my StampNation sistahs.  If you haven't heard of embossing paste, you will.  It's one of the hottest trends in paper crafting right now.   Around that time my friend Kristie received the gifting ball and she passed the ball on to me with a jar of Wendy Vecchi Metallic Gold embossing paste inside.  I squealed when I opened the package.    :)

Embossing paste reminds me a little bit of whipped frosting.  The metallic gold I used here is a bit softer than that.  The white paste I bought from Add A Little Dazzle is a bit fluffier.   To make my card I laid a damask metal stencil over my white cardstock, then I plopped the embossing paste on top and spread it with an offset spatula.  (the kind you find in the cake decorating aisle)


As you can see I am a long way from perfecting this technique.  Some of the paste seeped beneath my stencil.  I'm not sure why.  Perhaps I should watch the video Monica sent me as a prize and learn how to use this properly.  :)  I like the look though.  I didn't expect it to be perfect.


The center panel was embossed with gold embossing powder.  Then I stamped Iluminate ink with one of my Gorgeous Grunge stamps.  (I LOVE that stamp set!)   The finishing touch was to add my new Watercolor Wonder Washi Tape to the center panel as well as on the inside of the card.

On Sunday I will share with you my thoughts on the new year and some new goals.  For this first post of the new year I will let you in on one of them, enter more challenges!  They really do get my mojo flowing.  I'm linking this card up with the Friday Mashup Challenge.   Don't you just love the bling on those shoes?!  The challenge was to make a project with some glitter/shimmer/bling.   It feels like all my cards lately have a little bit of that on them.  


Happy New Year again to you and yours!  May this year be a year of creativity and joy!

Creative Blessings,
Heather North

Stampin' UP & Other Supplies Used
Stamps: Gorgeous Grunge, Perfectly Penned
Ink: Versamark, Illuminate Glimmer Pad
Paper: Basic Black, Whisper White
Misc: Damask Metal Stencil (DreamWeavers), Metallic Gold Embossing Paste (Wendi Vechi), Gold Watercolor Wonder Washi Tape (DU)

10.23.2013

Happy Birthday Debbie!

My husband's co-worker had a birthday recently and I wanted to give her a card.  She is one of the sweetest ladies you could ever hope to work with.  I asked Scott what her favorite color was.  He didn't know.  I asked if she had any special hobbies or interests that I might have a stamp for and he wasn't sure.  So, I went with Orange for the seasonal color and added some bling.  Every woman deserves to be queen on her birthday.


The card was an experiment with some glittery orange embossing powder I bought last summer from Cindy's Simple Stuff when she was closing her shop.  First I used a Versamark pen on the top and bottom of my banner, then I added the glittery EP and heat set it.  The results were not as great as I had hoped.  Not sure if it was "operator error" (very likely) or the brand of embossing powder I used.  Next time I think I will try just using glitter.   I do so dearly love the crown with the rhinestone jewels on top!


For the ribbon bow I wrapped the ribbon around my embossed stripes layer of cardstock, then I attached the faux bow to the front.  Of course the card needed a little more bling, so I added three rhinestones to the center of my bow.


Scott told me that when Debbie opened her card she didn't believe I made it.  He told her about my blog and she looked me up.  :)  Still not sure if she believes me.  Should I make another card like this and video it to show her (and you) how it's made?

Happy Birthday MONTH Debbi!!!  I think you should take the entire month off of work!  ;)

Creative Blessings,
Heather North

Card Recipe:
Stamps: Perfectly Penned, Gorgeous Grunge (ON SALE!!!) Crown??? Perhaps Tiny Tags (retired)
Ink: Smoky Slate, Versamark Pen
Paper: Whisper White Cardstock
Accessories: Pumpkin Pie Chevron Ribbon, Stripes Embossing Folder, Basic Rhinestones, Orange Glitter Embossing Powder (non SU)
---------------------------------------------------------------------------
In Stampin' UP! News....


Let the party begin-We'll bring the gifts! 25% Off 25 Stamp Sets. Hurry-sale ends October 28 - Start saving
Clicky to SHOP my SU Store now

Stampin' UP! is having a 25% off 25 stamp set sale!!!  Some of my current favorites are in that list and some others are going in my shopping cart.  What can I say?  I love a good sale.  :)

While you are shopping, don't forget to check out the weekly deals and new items at the clearance rack.  Be on the lookout on Thursday for a new daily deal.  But jump on that one fast as it only lasts ONE DAY!


11.30.2012

Masculine Get Well

Masculine get well cards are hard to find.  I have two very special men in my life going through cancer treatment so I made 2 cards.  Now I have them ready to send when they need a little encouragement to get through the rough days.


Just because I made these for men doesn't mean they couldn't also be sent to a woman. 


The ribbon treatment on this card is something that really makes it custom.  It's easy to do.  Check out my video to learn how I made this card and added the ribbon detail to my buttons.


Note- If you are reading this post in an email, you may need to go to my blog to view the video.

I hope and pray you do not need to send a get well card, but if you do then hopefully this will spark some ideas. 


Creative Blessings,
Heather North


Midnight Muse 3/8" Stitched Satin Ribbon
Midnight Muse Stitched Satin Ribbon

Clockworks Clear-Mount Stamp Set
Clockworks


Brushed Bronze Designer Buttons
Brushed Bronze Buttons

Comfort Café Designer Series Paper
Comfort Cafe DSP


Perfectly Penned - Clear-Mount Stamp Set - by Stampin' Up!
Perfectly Penned


9.17.2012

Masculine Monday ~ Get Well ~ TSOT#83


My Father in Law is going in for knee surgery soon and I wanted to make a couple of Get Well cards that we could send him while he is recovering. 


It's nice to have masculine get well cards on hand.  I've found it difficult to find them in the store.  The stamp set I used was Friendship Preserves, then I used a stamp from Perfectly Penned to cover up the "yum" with "Get Well".  Of course this card was completely inspired by this week's sketch from Try Stampin' On Tuesday


All the papers are from the Festival of Prints DSP stack.  It's not just for Christmas, as you can see.  This is a great pack of papers.  I've made several cards with it, and have barely made a dent in it.  :)  I love stacks like that!

I made another Get Well card over the weekend that could easily be sent to a man or a woman.  I'll be sharing it later this week, so if you want more masculine or well wishes card ideas be sure to check back in. 

Creative Blessings,
Heather North


Friendship Preserves Clear-Mount Bundle
Friendship Preserves Bundle


Festival of Prints Designer Series Paper Stack
Festival of Prints DSP Stack


Perfectly Penned - Clear-Mount Stamp Set - by Stampin' Up!
Perfectly Penned

Island Indigo 3/8 Inch Ruffled Ribbon - by Stampin' Up!
Island Indigo Ruffled Ribbon

7.04.2012

Happy Birthday America! ~ rs#18

Don't you love the 4th of July?  It's a day of celebration.  This holiday is one of our family favorites because we love our country and FIREWORKS!  This year my dear husband is sick, so we might end up just watching our neighbors light off their fireworks.  :(  Poor guy.  It's one of his favorite things to do, and he looks forward to it all year.  Maybe this card will cheer him up.  :)


This card was super easy to make, with a bit of inspiration from Retro Sketches.  You could whip one up right now and take it to the host/hostess of your 4th of July bash! 

Use your 1" square punch and punch out 2 of each color (Midnight Muse & Raspberry Ripple), then take your Postage Square Punch and punch out 4 Sahara Sand squares.  Last punch out 2 more of each color (Midnight Muse & Raspberry Ripple) using your 1 1/4" Square Punch.  Now layer them together with your favorite adhesive.

 Don't have those punches?  Simply use your cutter and cut your squares.  (1 1/8" for the Sahara Sand) 

Retro Sketches

I don't have a SU star punch so I used one of my old CM star punches and punched out the glitter paper.  oooh  aahh.  Love me some sparkle!

Even though I used Cherry Cobbler Baker's Twine, I think the color is a close-enough match.  What do you think?  I simply wrapped it around the card front 3 times and tied it in a bow.  Then I scrunched up the bottom 2 rows and left a gap in between them and the top.  To secure the bow, I used a mini glue dot and rolled it into a ball so I could hide it under the knot.  :)


The finishing touch is the sentiment from Perfectly Penned (in Midnight Muse) and 3 little hearts at the bottom.


I hope you have a safe and wonderful 4th of July.  Here are some shots from last year's backyard bash.  :)


God Bless America!
Heather North

Card Recipe:
Stamps: Perfectly Penned
Ink: Midnight Muse
Paper: Midnight Muse, Raspberry Ripple, Sahara Sand, Silver Shimmer Paper
Misc.: Cherry Cobbler Baker's Twine, Small Heart Punch, 1" Square Punch, Postage Punch, 1 1/4" Square Punch, Star Punch (CM)

6.19.2012

Teacher, You Rock!

My children have been blessed with some good teachers over the years.  Last year there was one that really stood out from the rest.  She called us at home a couple of times to let us know what a joy our son was to teach.  She praised him and wanted us to know how good he was doing?  Isn't that awesome?!!!  I wanted to give her an extra special card to show my appreciation.


I got this Great Sport stamp set to make baseball thank you cards, but I thought if I stamped it in black and added some Melon Mambo pink, then I could use it to let Mrs Hill know that I think she ROCKS.  :)   What do you think?

Instead of a ball, I stamped an image from Blue Ribbon stamp set in Melon Mambo, and then I pulled out some more new goodies to do the Thank You banner.  :)  (Itty Bitty Banners stamp set and the Itty Bitty Framelits dies... LOVE them!)


The inside had to be special too.  :)  (Perfectly Penned, XL Oval, and Decorative Label Punch) 


Thank you Mrs. Hill and all the other teachers out there who give of their time, energy and talents to teach our children.


Creative Blessings,
Heather North


Great Sport Clear-Mount Stamp Set
Great Sport


Blue Ribbon Clear-Mount Stamp Set
Blue Ribbon


Bitty Banners Framelits Die
Bitty Banners Framelits
Itty Bitty Banners Clear-Mount Stamp Set
Itty Bitty Banners


Basic Black 1/2 Inch Scallop Polka Ribbon - by Stampin' Up!
Scallop Dotted Ribbon


Top Note Stampin' Up! Bigz Die - by Stampin' Up!
Top Note Die