Showing posts with label Embossing Paste. Show all posts

8.05.2015

Stamp of Approval Blog Hop


It's finally here!  The big blog hop and reveal of the very first Stamp of Approval box featuring the exclusive Friendship Collection!  I'm almost bouncing out of my seat to share this with you.  Is it weird to be this excited about stamping stuff?  I didn't think so!  ;)


It's easier to show you a video then try to explain, so here you go!
http://youtu.be/Oin_zPmeGyI


Now be sure to hop along to the other designers in this hop and leave a comment.  One lucky commenter will win a FREE BOX!!!  Woot-Woot!!!

Blog Hop Order:

Stamps: Girlfriend (CASual Fridays for Stamp of Approval)
Ink: Versamark, Cracked Pistachio (Distress); Bermuda Bay, Pool Party, Cucumber Crush (Stampin' Up!)
Paper: Basic Black, Whisper White (Stampin' Up!)
Accessories: Black & White Twine (Doodlebug); Pattern of the Rings Stencil (Winnie & Walter for Stamp of Approval); Love Ya Fri-Die (CASual Fridays for SOA); Translucent Embossing Paste (Wendy Vecchi); White Embossing Powder (Stampin' Up!); Xyron 1.5" Sticker Maker


8.28.2014

Butterfly Hello

Since  I've been posting different seasons this week, I decided I must make a "Spring" card.  When I think of Spring I think of soft pastels, flowers and Easter.  Sitting on my desk was this beautiful embossing paste background that I made a couple of weeks.  (clicky to see that post) I've been meaning to make it into a card, but life got in the way.


I was inspired by the Inspiration Nation photo challenge at StampNation from a couple of weeks ago.  If you are counting, that is 4 cards inspired by one awesome photo.  It doesn't hurt that I love butterflies.  


This card was so easy to put together, because the background was done.  I cut out a couple of butterflies from some scraps of purple vellum, and the hello script from black cardstock.  A few sequins finishes it off beautifully.

Stamping Supplies:
Paper: Basic Black, Whisper White, Vellum
Dies: Hello Script (Mama Elephant), Interlocking (Penny Black), Leanna Butterfly (SSS)
Accessories: Dreamweavers White Embossing Paste, Sparkling Clear Sequins (Pretty Pink Posh)


8.12.2014

Heart Colored Embossing Paste ~ PTI#176

Yesterday I was checking out a video on the Papertrey Ink blog and it so inspired me that I had to go down to the craft room and play with some embossing paste, ink and homemade cardstock stencils.


To create my own stencil I used my new Heart Border punch from Stampin' UP! and punched a row of hearts.   I adhered them the way Laura shows in her video.  Unfortunately the washi tape I used to adhere my "stencil" down ended up tearing my paper.  My plan was to make it more of a one layer card.  Happy accident though because I cut it down and added a strip of Lavender cardstock.  I might like this a little better than my original idea.  ;)


As I was playing with mixing colors I found that I had used WAY TOO MUCH embossing paste for the teeny tiny hearts.  I just couldn't throw all that scrumptiously colored paste away so I quickly grabbed another die cut that was laying on my messy desk and put it on a separate piece of white cardstock.  Now I have the beginnings of a brand new card.  Come back later in the week to see what I do with it.  Any suggestions?

Be sure to check out the link below for the video and challenge.

Make It Monday #176: Backgrounds with Embossing Paste

Stamping Supplies:
Stamps: Dress Form (PaperTreyInk)
Ink: Hawaiian Shores (PTI), Plum Pudding (PTI), Cadillac Pink Glimmer Mist (Tattered Angels), Sea Glass (SSS),
Soft Lilac Shadow Ink for the sentiment (Hero Arts)
Paper: Lavender (SSS), Whisper White (SU)
Accessories: Hearts Border Punch (SU), Dreamweavers White Embossing Paste


Hearts Border Punch by Stampin' Up!
Hearts Border Punch


8.01.2014

You're A Star * Stampin' Celebration August

August is here and that means many of us are gearing up for back-to-school.  Say, what?!!  I'm not ready!  Ok, a small part of me is ready to have a quiet house for a few hours, but I do dearly love the relaxed schedule of summer and extra time with my boys.  My friends in CA will be sending there kids off to school in the next couple of weeks, so I suppose it is time to start creating cards for teachers, helpers and our kiddos lunchboxes.


Stampin' Celebration is going to help us get in the back to school mode with this fun photo challenge.  In honor of the bright yellow school bus and primary school colors I have made this card that I think any child would love to find in his or her backpack.


The background was created using Stampin' UP!'s new hearts and stars stencil and white embossing paste.  I set it aside to dry, which didn't take long in the hot garage, and then sponged over the entire piece with Daffodil Delight ink.


The star die cut was actually leftover from another project.  It was too cute to throw away.  The sentiment panel was cut from the same background piece I had created for the star.  Again, a scrap I couldn't throw away.  It's ok to save your scraps and use them later.  Just give yourself a deadline to use it and then throw it away.  (For me that deadline is when my scrapbox gets too full to put any more scraps in.)

Stamping Supplies
Stamps: Pictogram Punches (SU)
Ink: Daffodil Delight (SU), Calypso Coral
Paper: Whisper White, Maritime DSP
Accessories: Coastal Cabana Thick Baker's Twine (SU), Dreamweavers White Embossing Paste, Hearts and Stars Decorative Masks (SU), Tag Topper Scallop Punch (SU)


Pictogram Punches Clear Stamp Set by Stampin' Up!
Pictogram Punches

Hearts & Stars Decorative Masks by Stampin' Up!
Hearts and Stars Decorative Masks
Tag Topper Scalloped Punch
Tag Topper Scallop Punch
Coastal Cabana Thick Baker's Twine by Stampin' Up!
Coastal Cabana Thick Baker's Twine


3.28.2014

Embossed Embossing Paste ~ Video

I've been wanting to make a card like this since I took the Holiday Card Workshop 2013 last fall and watched Debby Hughes do a similar technique.


Yes, the calendar says it is Spring, but the weather is a little more like winter outside.  I thought today was the perfect day to try out this technique and make a Christmas card.

Note:  If you are reading this post in your email or on a reader you may need to visit my blog to view the video above.  :) Click on the post title to go there now.

Isn't that a fun technique?  So many possibilities.


The embossed embossing paste is so pretty and sparkly in real life. I wish I could have captures that in the video, but this close up picture shows it very well.

MM#101

This card is going up in the current Merry Monday challenge.  It's the card I wanted to make earlier in the week, but didn't have time to also film a video for you.


Supplies:
Stamps: More Merry Messages (SU)
Misc: Wooden Bird, Leafy Branch (Savvy Dies), Snowflake Stickers, Dreamweavers White Embossing Paste, Silver Embossing Powder (SU)


2.16.2014

Fight Like A Girl

If I had superpowers I would erase Cancer.   Unfortunately I don't have the power to do that, but I can stand behind my friends and family in the battle for their lives and offer prayers, support, encouragement, tears and a well timed card.


This card will be sent to one of my friend's battling breast cancer, but it was made for all of you touched by cancer in some way.  {hugs}


Butterflies are symbol of hope for a beautiful tomorrow, to me, so I chose to include a butterfly over my pink ribbon.
TCC3
I'm linking up with a new challenge that I hope you will check out. The Card Concept There are so many styles represented in the design team for this challenge site that you are sure to find your own somewhere in them.  I'm pretty sure my card today fits in the Shabby Chic category, but it could also fall under Freestyle Collage and Classy & Elegant.

Fusion#4
I'm also linking up with the fusion challenge using the butterfly against a blush background. Hopefully I will get a chance to make another card using the sketch.


Sending out prayers and healing thoughts to all of you out there battling cancer or taking care of someone who is.  "Fight Like A Girl" and kick cancer's but!

Creative Blessings,
Heather North

Card Supplies:
Stamp: Fight Like A Girl (A*muse Studios), Gorgeous Grunge (SU), EnFracais (SU)
Colors: Blushing Bride, Pink Pirouette, Regal Rose, Smoky Slate (SU)
Accessories: Embossing Paste, Leanna Butterfly (SSS), Leafy Branch (Savvy Dies), Tessatina Stencil (Memory Box), Vellum Cardstock, Basic Pearls, Tea Lace Doily, Pink Taffeta Ribbon, Wink of Stella Pen, Irridescent Ice Embossing Powder


1.17.2014

Snowman ~ Merry Friday

We've had an unusual winter.  Today has felt more like spring with the sun shining, but it is cold outside.  Personally I think if it is going to be in the 30's we need snow.  :)  This card would make a super cute "Thinking of You" or "Get Well" card, but I am planning on using it for Christmas.


I am 2 for 2 with the Merry Monday challenges this year. If I keep up at this rate I won't have to stress about Christmas cards in December.  :)  The challenge this week is to use a snowman.  The snowmen on everyone's cards in the challenge are so cute!  You should check it out if you like snowman too!

MM#91
I'm also linking up to the Simon Says Stamp Wednesday Challenge.  The challenge this week is to use embossing.
Simon Wednesday Challenge Blog
1-15-14

Even though we don't have snow on the ground right now I was able to create some of my own snow using embossing paste, a stencil, and some iridescent ice embossing powder.  It was easier than it may sound and I love the results!


The snowman himself was made using white embossing powder, Staz-On ink, a small triangle of orange cardstock and some stickles for his heart.  Did you spot his scarf?  I pierced a hole on either side of my snowman's neck and wrapped some Baker's Twine through the holes, then tied them in a knot. 


Pool Party Baker's Twine was also used to wrap around my Coastal Cabana cardstock. I'm happy to have another card to put in my almost empty Christmas card box.  In addition to Merry Monday Challenge I am linking up to the Simon Says Stamp Wednesday Challenge.   The challenge is to use embossing.  I embossed my snowman with white embossing powder.


Thank you Merry Monday challenge and design team for the fun challenge.

Creative Blessings,
Heather North

P.S.  If you are looking for the Birthday Bash Special, CLICKY to find all the links and info.

Stamps: Snowy Day
Ink: Black Staz-On, Versamark, White Staz-On
Paper: Coastal Cabana, Soft Sky, Whisper White
Misc: Pool Party Baker's Twine, White Embossing Paste, Swirl Stencil, Iridescent Ice Embossing Powder, Whisper White Embossing Powder, Corner Punch (retired)

1.01.2014

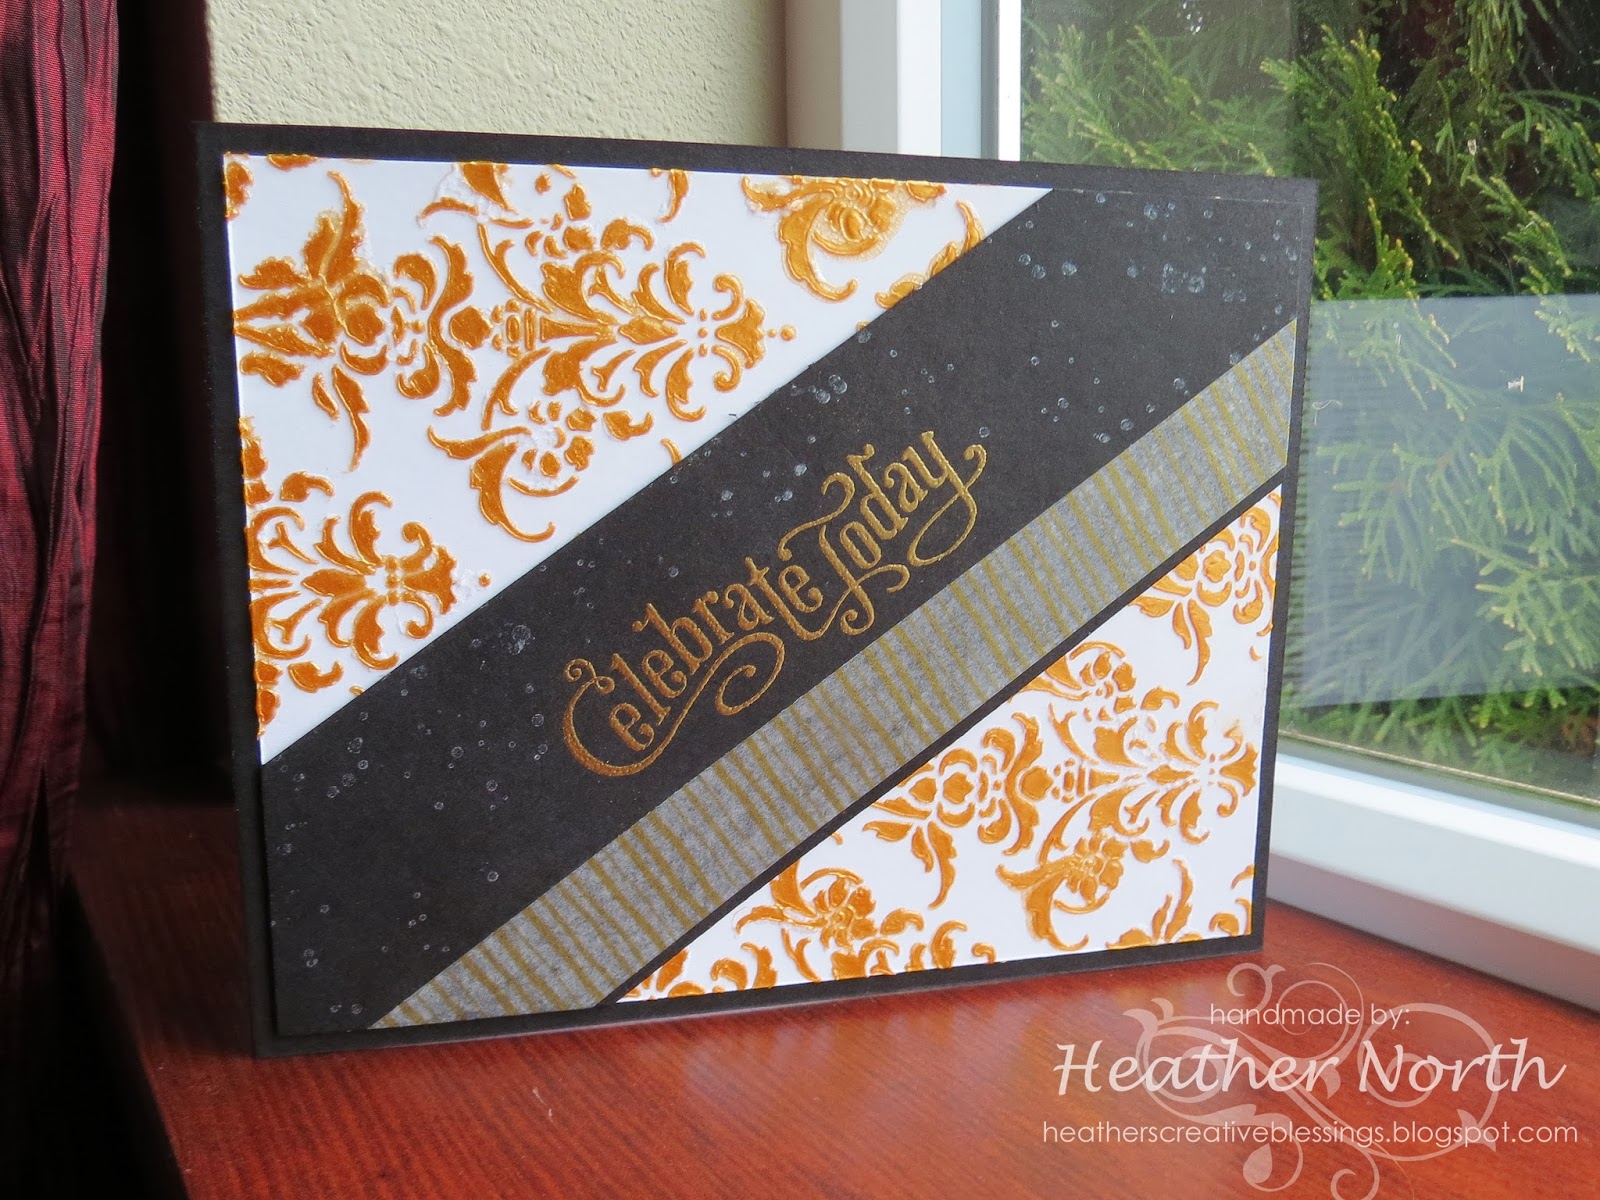
Celebrate Today

HaPpY nEw YeAr to YOU!  Did you have a fun time ringing in the new year last night?  Everyone but the animals enjoyed it at our house.  Poor little Bella and Sasha do not like fireworks and they went off every hour, at least, for about 6 hours.  

Welcome 2014!

Towards the end of last year I was having an online discussion about embossing paste with some of my StampNation sistahs.  If you haven't heard of embossing paste, you will.  It's one of the hottest trends in paper crafting right now.   Around that time my friend Kristie received the gifting ball and she passed the ball on to me with a jar of Wendy Vecchi Metallic Gold embossing paste inside.  I squealed when I opened the package.    :)

Embossing paste reminds me a little bit of whipped frosting.  The metallic gold I used here is a bit softer than that.  The white paste I bought from Add A Little Dazzle is a bit fluffier.   To make my card I laid a damask metal stencil over my white cardstock, then I plopped the embossing paste on top and spread it with an offset spatula.  (the kind you find in the cake decorating aisle)


As you can see I am a long way from perfecting this technique.  Some of the paste seeped beneath my stencil.  I'm not sure why.  Perhaps I should watch the video Monica sent me as a prize and learn how to use this properly.  :)  I like the look though.  I didn't expect it to be perfect.


The center panel was embossed with gold embossing powder.  Then I stamped Iluminate ink with one of my Gorgeous Grunge stamps.  (I LOVE that stamp set!)   The finishing touch was to add my new Watercolor Wonder Washi Tape to the center panel as well as on the inside of the card.

On Sunday I will share with you my thoughts on the new year and some new goals.  For this first post of the new year I will let you in on one of them, enter more challenges!  They really do get my mojo flowing.  I'm linking this card up with the Friday Mashup Challenge.   Don't you just love the bling on those shoes?!  The challenge was to make a project with some glitter/shimmer/bling.   It feels like all my cards lately have a little bit of that on them.  


Happy New Year again to you and yours!  May this year be a year of creativity and joy!

Creative Blessings,
Heather North

Stampin' UP & Other Supplies Used
Stamps: Gorgeous Grunge, Perfectly Penned
Ink: Versamark, Illuminate Glimmer Pad
Paper: Basic Black, Whisper White
Misc: Damask Metal Stencil (DreamWeavers), Metallic Gold Embossing Paste (Wendi Vechi), Gold Watercolor Wonder Washi Tape (DU)