7.31.2013

Inspired Birthday

This summer is flying by fast.  Today I needed a break from laundry and ironing, so I went down to the hobby room with a few challenges to try.  :)


My first inspiration came from the lovely photo below at Hand Stamped Sentiments.  As soon as I saw it I wanted to use it to make a card.  :)


HSS

I took the colors from the photo as well the little bow on the girl's shoe.  The colors I used were So Saffron, Pear Pizzazz, Strawberry Slush, with just a touch of Baked Brown Sugar. 


The stack of 3 books made me want to find a sketch that had strips or blocks that I could fill with color.  Mojo Monday didn't let me down.  :)


MM304
Isn't it perfect?   I thought about making the card rectangular so that more of the background paper would show, but the whole point of this week's challenge is to make a square or round card. 


To add the round portion I stamped the flower from Oh, Hello stamp set using Strawberry Slush and Pear Pizzazz markers onto a Tea Lace Doily.  To make the stamped image stand out I punched out a white 2 1/2" circle and adhered it to the back of the doily before putting it on the card.


Even the inside is decorated on this one.  I used a background stamp and versamark to create a background.  Then I stamped a Happy Birthday sentiment (retired SU) and cut that out with the window's framelit. 


Let me tell you, working with two challenges to make a card was way more fun than fighting with my iron.  :) 


Creative Blessings,
Heather North

Stampin' UP! Products Used
Ink: Pear Pizzazz, Strawberry Slush
Paper: Afternoon Picnic DSP, Twitterpated DSP (retired), Pear Pizzazz CS, Baked Brown Sugar CS
Stamps: Oh Hello, Retired Happy Birthday
Accessories: Tea Lace Doily, Basic Rhinestones, Windws Framelits, Strawberry Slush Ruffle Trim Ribbon


7.29.2013

Masculine Monday

Here is another card using Kristie's sketch.  Last Friday I showed you a flowery version. Clicky  Today I flipped the sketch on its side and gave it a masculine touch.


The splatter was made using the Gorgeous Grunge stamp set.  This is quickly becoming my most used stamp set.  It's not flashy, but it creates wonderful backgrounds that add that extra touch most cards of mine need.


My favorite touch though is the little Tim Holtz paper clips.  Aren't they cute?! 


Creative Blessings,
Heather North


7.27.2013

Sew Saturday ~ Practice Quilts.

This week I took a little break from my Star Shadow quilt to make some practice quilts.  My SS quilt needs at least a couple hundred new pieces cut, and it takes a lot of time and space.  I knew I wouldn't have a lot of time this week and it was likely that the cat or the fan would blow my pieces off the table if I just left them sitting out.


I decided to make a couple of quilts from some old fabric and blocks that were lying around.  It's really shown me the difference between high quality fabric and the bargain been at Wal-Mart.

When I took my Free Motion Quilting (FMQ) class in May the instructor advised us to make some practice quilts that we could later throw away or donate to a local animal shelter or homeless shelter, or other charity in need of quilts that do not need to be "perfect".   This takes a big load of pressure off for the beginner.


I haven't done any Free Motion Quilting since before my vertigo got really bad, so I decided to work on these practice quilts before I am ready to start quilting my star shadow quilt.  The quilt top you see above was made from some crookidy squares.  I was going to toss them, but I figure they will be good for practice, and the animals don't care if my blocks are straight, nor do they care where the fabric came from.


My next quilt top used some pre-cut squares I had cut out using my Big Shot and the scallop square die from Stampin' UP!  (now retired)  I didn't have very many squares left, so to make the quilt bigger I added in some borders.


Another thing I did with this quilts was to use the last of this spool of thread.  Somehow I managed to buy polyester thread instead of 100% cotton.  I've been told I should only use 100% cotton when quilting, but again I figure the animals won't know the difference.   :)


It's been kind-of fun playing with my scraps and coming up with some different designs.  It's been frustrating using cheap fabric with nice fabric and the stretch of some verses the stiffness of others, but I figure any time spent creating is not wasted.


Hopefully next week I can get these puppies (no pun intended) quilted and the pieces cut for my star shadow quilt.  What are your creative goals for next week?  In the meantime I am off to spend some time soaking in the sun at the beach.

Creative Blessings,
Heather North

7.26.2013

Hello Summer

Doesn't this card scream summer to you?  It does for me.  I used a retired Stampin' UP! kit that came with paper and stickers in these bright, fun colors.  Then I added some new white candy dots to the center of each flower.


Originally I was going to make the card horizontal, but when I stood it up on my desk I thought it was super cute going vertical with the flowers on the left side.  What do you think?  


Both directions work great.  In fact I have flipped this sketch 4 ways and have loved every one of them.  In fact, I have already used this sketch on 5 different cards!  I am keeping this design in my arsenal.  This fantastic sketch was made Maureen Merrit  for a StampNation challenge and was based on a card by Kristie Goulet.

SN Sketch
If you've never been to these ladies blogs, you really should.  Both of them are on the design team and I am honored to be among them.  Mo is the queen of Clean and Simple (CAS) cards.  I have learned so much from her and love her style, even though I am more of a "layer it on" type of girl.  If you see me make a CAS card chances are she has inspired me in some way. 

Kristie has also mastered CAS cardmaking, but she likes to mix it up and experiment with different styles and trends.  She's also one of the kindest ladies you could ever hope to meet online.  I just love her fresh card making style and designs.  

Click on the links to go to their blogs.  :)  Kreative Kristie and Mama Mo Stamps


Do you see how the aritsan label is sticking up just a bit?  I did that by scoring it and folding it.  This week has been crazy busy so I didn't get time to film a video.  Perhaps I will use this technique on another card soon and film that video for you.  

Creative Blessings,
Heather North
A Dozen Thoughts
A Dozen Thoughts

7/8" Scallop Circle Punch
7/8" Punch
Artisan Label Punch
Artisan Label Punch


7.24.2013

Stampin' UP! Stuff

Stampin' UP! had their annual convention last weekend celebrating 25 years of making a difference.  At the convention they announced some new products coming out.  First up is the undefined stamp set.  Basically you get the rubber and tools to make your own stamp design. 


If you have that artistic flair and want to design your own images, this is the kit for you.  I'm thinking about buying one for my son.  He's a great artist and I would love to see what he could come up with. 

PDF

Even though I didn't go to convention, I was able to watch the video SU put out on how to use this nifty new product.  You can too.  See the video below.

That kit is available today, but SU also announced some new Framelits that will be available August 1st.  That's only a week away.  I think I can wait that long.  These are card framelits to make some fancy swing cards easily.


Isn't that the coolest?!  I've made cards similar to this, but they were hard to do.  These new framelits make it super easy.  They also come with several smaller framelits in the package.  There are 2 different sets to choose from.  I think I will get them both.


PDF

Have you heard about Paper Pumkins.  It's a kit from Stampin' UP!  that is shipped to your door every month.  Each box is a surprise and each month carries a different creative kit.   Some months have cards, others may be a banner or a journal.  You will get an idea sheet and instructions.  Right now until August 31st you can try your first 2 months for only $10 a month.  At that price I think I  might just sign up myself.


The kits are all made with the beginner in mind, so even if you've never stamped before you can create the project.  It can be used by any paper crafter though, and I can see "stepping it up" with supplies I already have on hand.  So far the kits I have seen are all really cute.   If you would like more information on Paper Pumpkins click the link.  CLICKY


2013 Holiday Catalog

One last little update.  Your Stampin' UP! holiday catalog should have arrived or it should get to you soon.  If you did not get a new catalog and want one, please let me know.   You can view the catalog online by clicking the link in the picture above.  You can start ordering from the new holiday catalog on August 1st.  It's going to be like Christmas in August around here.  :)

Creative Blessings,
Heather North


7.22.2013

Masculine Monday ~ In My Thoughts


Last week I posted a Hexagon card and video.  After I was finished filming the video I had all these punched out hexagons on my table, so I decided to make a second card.  This time I used Crumb Cake for the cardstock, but the background stamping is the same as it was in the video.

I used the same sketch to design both cards from a new-to-me challenge site called CAS(E) this Sketch.  Even though I used hexagons for both my cards I this design would be cute with many different shapes.  Grab your punches and give it a try.  ;)

CTS

To jazz this card up a bit I added some Baker's Twine I got from Cindy's Simple Stuff during her going out of business, but not really, sale.  :)  Sorry I don't know who makes it, but I loved that it was a mixture of colors instead of just one or two.


Other than the twine the cards are really similar.  I changed the background color and the sentiment too, just to show you (and myself) the versatility of this sketch. You can check out the video below if you missed it last week or you can click HERE to go to that blog post, see the other cards and watch the video.


***Note if you are reading this post in an email or reader you may need to go to my blog to view the video above.  Click on the post title at the top to go there now.


Creative Blessings,
Heather North

This And That Epic Day Designer Series Paper
This and That Epic Day DSP
A Dozen Thoughts
A Dozen Thoughts

Gorgeous Grunge
Gorgeous Grunge


7.20.2013

Sew Saturday & Family Share

My small star shadow blocks are finished for the wall hanging I intended to make.  :)  I made my sewing goal for the month with time to spare. Which would be great, except now I have decided to make it a lap quilt.  Back to cutting and sewing, but it is such pretty fabric that I don't mind.


Before I started cutting and sewing again though, I decided to lay out all the blocks and see how it looked.  I'm glad I did because I think I will be making a couple of changes to the original pattern.  Isn't that the fun of having a design wall?  You can see what your quilt will look like and make changes before you sew it together.


I forgot to add in the sashing and I haven't made the flying geese for the border yet, but this gives you a pretty good idea.   After seeing it all together on the wall I've decided I want more "white space".   Perhaps I have been looking at too many Modern Quilt websites and books.  :)  I'm excited to see what the final quilt will look like.


My son was in the room with me when I was putting these up, so I played around with the placement of the stars.  Can you spot the difference between the two quilts?  I really was having too much fun!


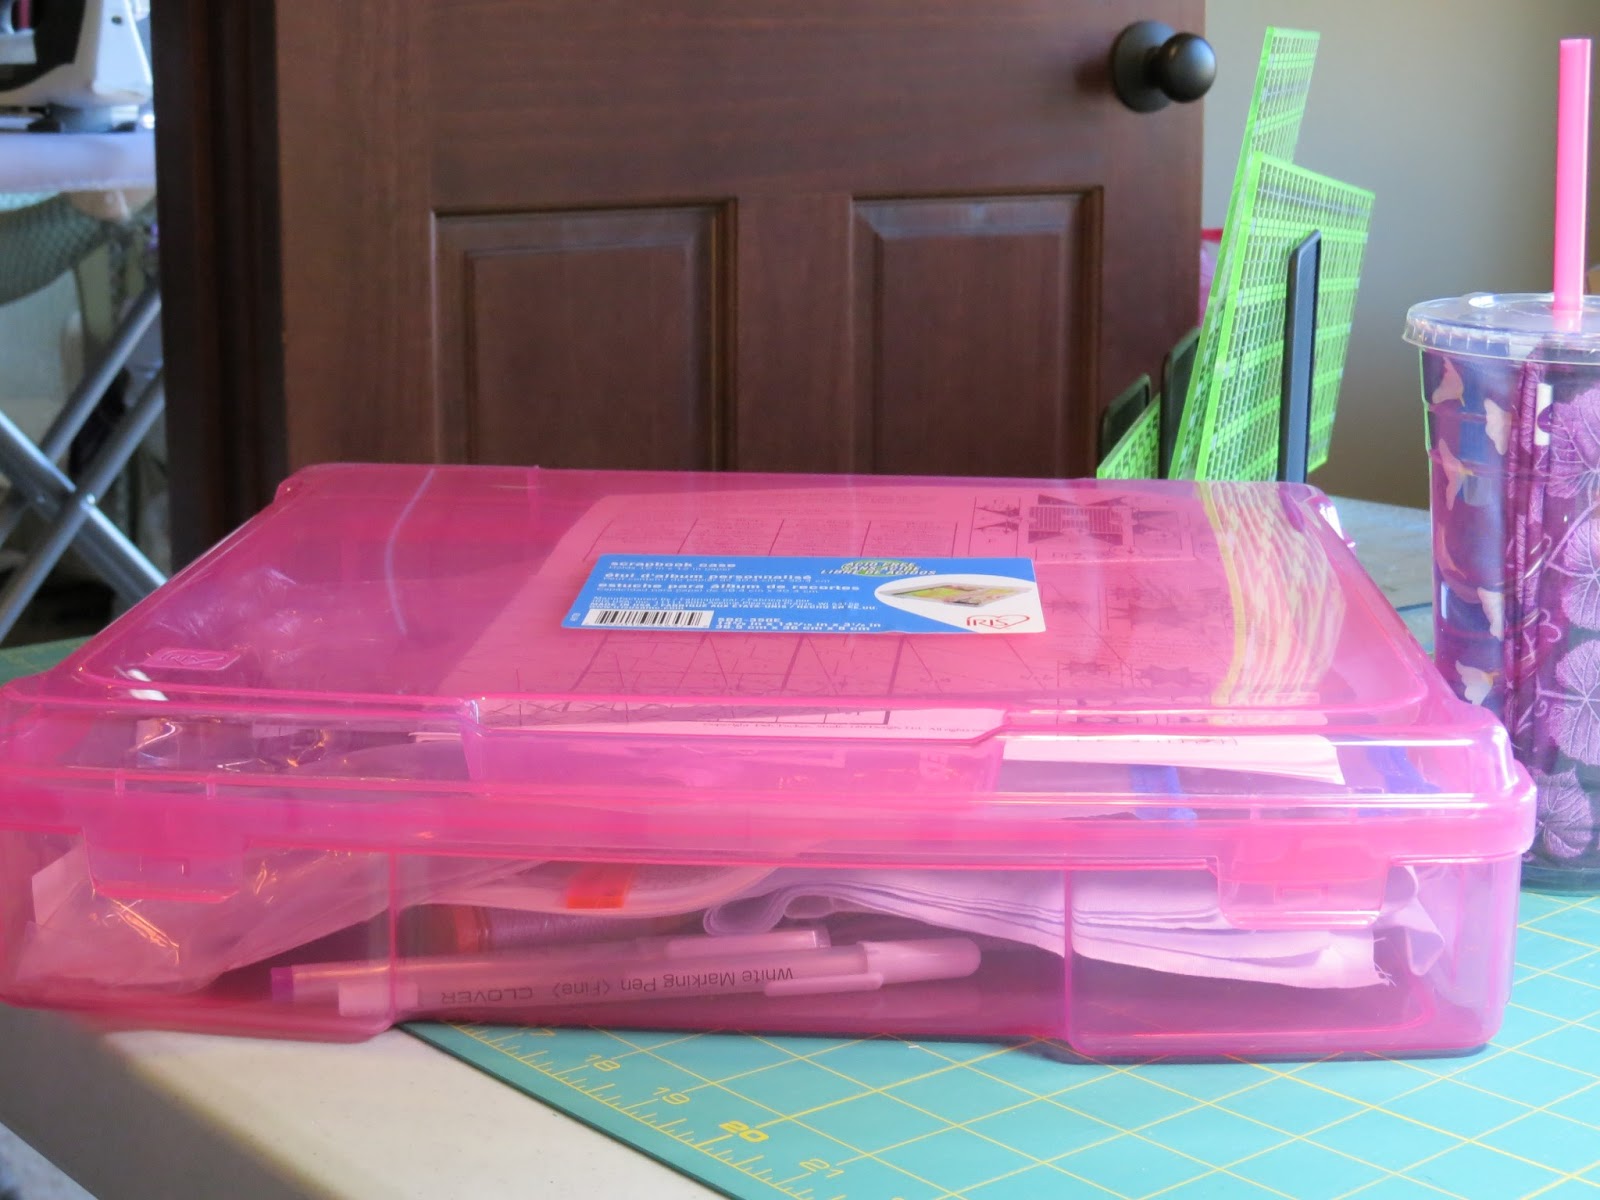
Above is how I keep my WIP (Work In Progress) organized.  I store them in a 13x13" box I picked up for scrapbooking.  It's a great size to hold my pattern, fabric, thread and tools so it all stays together.  Each individual cut piece is kept in a baggie with a piece of paper stating its size.  All 5 1/2" white squares together, all 2x3" swirly purples together, etc.


It works for me and I can take it with me if I am going to sew away from home.  Actually that's why I organized it this way.  We had to bring the cut fabric with us to class and I didn't want to lose any pieces. 


Last weekend we took the kids to Longbeach, WA for a family fun day.  They have this great arcade there with Laser Tag.  Usually I join in the fun of laser tag, but with my recent bout of vertigo I decided that I probably shouldn't run around a dark room with strobe lights and lasers going off.  :)  Instead I took a short walk to Boardwalk Quilts. 


Two games of laser tag go by pretty fast when you are spending that time at a quilt shop.  I bought a couple more yards of fabric to match what I bought a few days earlier for Michael's quilt.  It's fun to find new fabric from a line you have fallen in love with.  As a souvenir I bought this darling purple fat quarter cup for myself. Isn't that the cutest idea?!


When I got back to the arcade the boys asked Scott and I to join them in a 4 player game of air hockey .  It was a lot of fun, but I lost every game we played.  That's alright with me though.  It was a great family fun day. 


Here are some more pictures of our little trip.  Michael with his new shades. 


Tyler smiling with the ocean at his back.  :)


We went down the coast a little bit and visited the lighthouse.  It was super windy there.


My husband got a couple of picture of me too with his new cell phone.  It's rare that I am in front of the camera.  


He thought it was pretty funny how short I looked compared to the lighthouse behind me and my son in front of me.  Whatever.  We were on a steep incline and I know I am short.  :D  Did I mention how windy it was?  Take a look at my hair. 


Creative Blessings,
Heather North